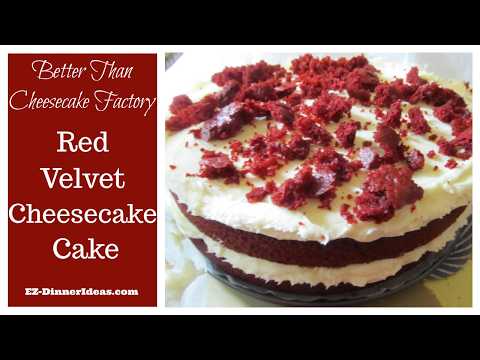
Red Velvet Cheesecake Cake Recipe
Way Better Than Cheesecake Factory
This red velvet cheesecake cake recipe was inspired by Cheesecake Factory’s one. Even though this dessert uses a lot of store bought help, the final result looks like you spent a boat load of money in a high-end bakery. Everybody is going to ask for repeat and your recipe.

Total Time: 54-59 Minutes
Prep Time: 30 Minutes
Inactive Cook Time: 24-29 Minutes
Serving: 8-12
When I took my son to get a dessert takeout to reward him a good quarter of work at school, I didn't think that a slice of cheesecake cake would be that expensive. Although my family and I had been there many times before, we never had room for dessert. I can't imagine how much it is going to cost for a family dining out in Cheesecake Factory with dessert to wrap up for the night.
I must admit that there is still quite a bit of work to put the cake together. However, it was worthy every second and effort spent on it. I guarantee that when you see your work, that satisfaction of your accomplishment is beyond words.
Table of Contents
TIPS & TRICKS
Cutting Off the Cake Top
 Cutting off the cake top to level out the cake layers.
One of the steps in assembling the cake is to cut off the cake top. This step is not required. But I still recommend you to do so because it will allow you to add even layer of cream cheese filling between the cake layers. Otherwise, it will be either bulky on top or the side of the cake has more icing.
You can save the cake top for making a different kind of dessert. Read further to find out how.
A Little Bit of Icing Goes A Long Way to Stabilize Everything
 A little bit of icing goes a long way to keep everything stuck together and stabilized.
When I first assembled this red velvet cheesecake cake recipe, I truly thought that it was easy as a piece of cake. Not until I started to spread the icing on top of the first layer and started to spin the cake around to even out the icing, I learned my big mistake. Yes, everything spin. I was frustrated that everything inside the springform pan spin. Honestly, it bothered me to no end even though the cake came out delicious and beautiful. Then, a few days later, I remembered the little bit of icing at the bottom of each cake when I bought from the baker coming into my mind.
To assemble the cake, you will transfer parchment paper and cake into the springform cake pan. Every time when you put an item into this pan, especially at the bottom and on the side, you will need a little bit of icing as glue to keep things stuck together. How much icing? About 1/3 teaspoon. If you use half of a teaspoon is plenty. A little bit goes a long way.
Should You Add the Icing on the Side of the Cake?
Great question. You do have enough to cover the side of this red velvet cheesecake cake recipe by following this recipe. I chose not to do it because I want to get it done. Besides, without the icing, the color contrast makes the cake look super beautiful.
What To Do with the Cake Leftover?
We mentioned earlier that we will cut the cake top off. So, what do we do with that?
If you have some cream cheese filling leftover, or make another half batch, the cake top pieces that you just broke can make trifle. As you know, nothing goes to waste in my book. That’s always my principle when it comes to food. Thanks to my mom ingrained this to us since we were kids.
Here are the instructions:
- Crush up the cake top into small pieces. (Bite size or smaller)
- Use glassware for parfait, glasses, clear plastic disposable cups or glass containers with lids.
- Depending on the height and the diameter of the container. If it is tall and narrow, repeat the following 2 steps at least twice so that the flavor, cake and icing distribution is even in every bite. You also need to adjust the volume of each layer. It will not be as much as we do with the trifle. If the container is wide and short, it will be trifle with the cream cheese icing in the middle between 2 layers of crushed cake top.
- Add a layer of crushed-up cake top to take up about 1/3 of the volume of the container
- Then, add cream cheese icing and finish the top layer with more cake pieces with about the same amount as the bottom layer.
Red Velvet Cheesecake Cake Recipe and Instructions
Ingredients
1 box Red Velvet Cake Mix
(Each brand requires different amount of oil, water and eggs. Follow the package instructions for those ingredients.)
Icing / Filling
2 blocks (8oz each) Cream Cheese in room temperature
1 stick (4oz) Softened Butter
3/4 cup Heavy Whipping Cream
2 cups Powder Sugar
2 tsp Vanilla Extract
Parchment Paper (best with grid lines)
2-8” or 9” Round Cake Pans
1 Springform Cake Pan (same size as the cake pans above)
- Follow the package instructions to do the following:
- Preheat oven and make batter with red velvet cake mix.
- Distribute batter evenly between 2 cake pans (8" or 9") and bake until toothpick inserted in the middle of the cake and come out clean.
- Let cake cool in room temperature (about 1-2 hours)
 Easy ways to fold up your parchment paper before cutting a circle out of it.
To assemble:
- Use parchment paper with grid lines on it. Measure out a section that can cover the entire bottom of the springform pan. The parchment paper roll I use is 15” wide. So, I am able to cut out about 4-5” of the leftover parchment that I can wrap around the cake on the side.
- For easy measurement is to put your springform pan on top of the parchment paper. From there, you will be able to find out the length of parchment paper that you need to get out of the roll.
- Once you get that piece of paper, put the pan on top of it again and push it toward an edge of the paper. This will prevent you cutting the circle / the size of the pan in the middle of that piece of paper.
- Trim out the extra paper and put it aside. This will be used for surrounding the side of the pan.
- You should get a square or somewhat close to one. Fold up the paper to make a triangle which is about 1/8 of the size of the original square.
- Put this triangle against the middle of the pan so that you can cut it out the edge to get a circle out of it.
- When the cakes are cool enough to add the cream cheese icing, combine butter, cream cheese, powder sugar and heavy whipping cream into a mixing bowl.
- Use the lowest setting of the hand mixer to mix the cream cheese mixture. You will need to stop in the middle to scrape down the side and mix again.
- Add vanilla extract and mix again until icing is smooth. (We will move on assembling the cake immediately. Without putting the filling / icing into the fridge will make it easier to assemble the cake.)
- Use a little bit of icing and put it on the parchment. Transfer the circular parchment paper to the bottom of a springform pan with icing side down. This will help to stabilize the paper. Do the same with the other pieces of parchment to surround the inside of the springform pan.
- Use a bread knife to cut across the top of the cake to level it out. Put the cake top aside. We will use them later.
- Use a little bit of icing at the bottom of the cake and put it into the bottom of the paper-lined springform pan. At this time, everything should be stable and not moving inside the pan at all. (This is very important. The first time when I made this cake, I totally forgot about using some icing as glue to stick everything together. When I iced the cake, everything spin around as I turned and leveled the icing. It was very frustrating.)
- Add about 1/2 of the cream cheese filling on top of the first layer of cake. Use a butter knife to evenly spread out the filling, but not overthrowing to the side.
- Then, add another cake and repeat the last step.
- Crumble the cake top as small as you can. Sprinkle these cake pieces on top of the cake. The cream cheese icing will keep them there. No need to cover the entire cake top with these small pieces. This is more for decoration.
- Cover the cake with plastic wrap and transfer to fridge for at least 4 hours before serving. ENJOY!
- (Use broken cake top to make trifle. Refer to the leftover section for instructions.)
Red Velvet Cheesecake Cake Recipe Steps with Photos
 2 main ingredients of this red velvet cheesecake cake recipe
 Separate batter into 2 equal batches between 2 same size baking pans
 Let it cool in room temperature about 1-2 hours.
 Add powder sugar (sifted, optional) into cream cheese icing
 Use hand mixer to combine cream cheese icing ingredients together
 Scrape the side of the bowl and mix again
 Add vanilla extract to the icing
 Room temperature icing is much easier in assembling the cake.
 After folding up the parchment paper, measure it against the radius of the cake pan.
 Cut the paper to make the size and shape of the pan.
 Use bread knife to cut off the cake top
 Put cake top aside for now
 Put a little bit of icing at the bottom of the first layer of cake to stabilize it.
 Add parchment paper on the side and use a little bit of filling to keep it in place as well.
 Add icing on top of the first layer of cake and spread it out evenly.
 Add second layer of cake on top of icing
 Spread out the icing on the second layer of cake
 Crumble the cake top
 Add pieces of cake top on top of the cake
 Chill cake for 4 hours and release cake from the springform pan.
 Cake is ready to serve. Doesn't it look beautiful?
 This cake will give you a sense of accomplishment beyond your imaginations. You are going to be so proud of yourself!
Slideshow
You May Also Be Interested In:
Get FREE eBook to Lose Weight this Summer

Once subscribed, you will be requested to confirm your email address one more time. Then, you will have a direct link to download all FREE e-books and exclusive recipes.
Subscribe to Our Newsletter Below

Recent Articles
-
Labor Day Weekend Cookout Backup Plan
May 31, 26 07:00 AM
Weather is one thing that nobody can control. What if you plan out everything for the weekend and now it needs to move indoor? No worries! You still can enjoy the juicy burger as it is coming off from… -
Easy Dinner Ideas
May 30, 26 06:24 PM
 Easy Dinner Ideas, with recipes and common sense cooking tips show you the surprising power of family meals and how to make dinner time family time.
 -
Smash Burger for A Smashing Cookout
May 29, 26 07:00 AM
Everybody is talking about smash burger. But do you really need to break your wallet to buy it? No, you can easily get the tools at home and make the patties by yourself. It's 100% fool-proof.


Home > Dessert Recipes > Red Velvet Cheesecake Cake Recipe | Better Than Cheesecake Factory