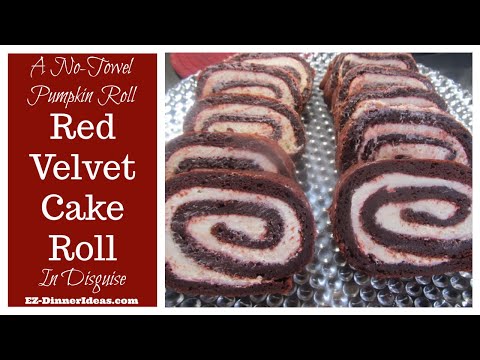
Red Velvet Cake Roll Recipe
Another No-Towel Pumpkin Roll Recipe In Disguise with An Extra Recipe to Deal with Broken Cake Roll!
Red velvet cake roll recipe is a start-from-scratch cake recipe, but taking the advantage of canned pumpkin to bring in the moisture and fiber into the cake. It makes this beautiful cake more attractive inside and out.

Total Time: 35-37 Minutes
Prep Time: 20 Minutes
Inactive Cook Time: 15-17 Minutes
Serving: 8+
This recipe was created because there are a couple of my family members not being the big fans of traditional pumpkin roll.
But I love the moist cake roll that a canned pumpkin brings. So, I thought that I am going to make some twists that whoever is going to enjoy this cake will not realize that it is a pumpkin roll in disguise.
Well, as you may have guessed already. This cake roll was a big hit. My son always asks me when I am going to make another one again.
Throughout this process, I also tried to use different kinds of filling, such as white chocolate one.
Unfortunately, it didn't come out well. I believe that the biggest reason is that none of my family and extended family members likes white chocolate. On top of that, I encountered a failure of rolling the cake roll. You know me...I don't like to throw food away. So, I thought of ways to use up my broken cake roll after knowing that there was no return to undo anything.
Thinking of many visitors asking about what they can do with their broken pumpkin roll at the time. I believe that this failure was meant to be so that I can try out different ways to use up the broken cake roll.
Table of Contents
TIPS & TRICKS
Check the Expiration Date
You may have heard many chefs reminding everyone to check the expiration dates of both baking powder and baking soda. I cannot emphasize how important it is, especially after a couple lessons learned in a hard way.
When either one of these ingredients expired, the cake does not rise the way it is supposed to be. You may not realize it when you look at your cake freshly out of the oven. That slight difference will affect you when you start making the cake roll. It can cause it not rolling correctly or break. So, make sure you check the expiration date.
Red Food Coloring
This red velvet cake roll recipe uses liquid food coloring. I understand that this is the ingredient that could raise your eyebrow if you are the kind of person always sticking to healthy diet without adding any artificial ones in your food. I tried several times to reduce the amount of the red food coloring. But it didn't turn out the way I liked.
Just bear in mind that once the batter is baked, the color will be a shade darker. You can start out with 4 teaspoonful in your batter first and add more when you see fit.
Cocoa Powder
I always have dark chocolate cocoa powder in the pantry for other recipe use. If you like more cocoa action in your food, dark chocolate cocoa powder is definitely the way to go. Just remember that the cocoa powder also contributes to the color of your red velvet cake roll.
Using dark chocolate cocoa powder will make the shade of your red velvet cake roll darker. On the other hand, using milk chocolate cocoa powder will be a touch lighter.
How to Roll the Cake?
The tips are next to each step in the recipe and instructions section. I highly encourage you to read through everything, at least once, before making this beautiful red velvet cake roll recipe. This will arm you with more knowledge and confidence in the process. Have fun!
Red Velvet Cake Roll Recipe and Instructions
Wet Ingredients
1 can (14oz) Pumpkin Purée
3 Eggs
1 tsp Vanilla Extract
1 cup Sugar
No-Stick Cooking Spray
Dry Ingredients
2 tbsp Baking Cocoa Powder
1 tsp Expresso Powder (optional)
3/4 cup All Purpose Flour (more for dusting)
1/2 tsp Baking Powder
1/2 tsp Baking Soda
1/4 tsp Salt
6 tsp Red Food Coloring (Liquid, not gel)
Cake Filling Ingredients
1 Block (8 oz) Cream Cheese (in room temperature)
1 cup Sifted Powdered Sugar
6 tbsp Butter (in room temperature)
1 tsp Vanilla Extract
Powdered Sugar (optional; for dusting)
Instructions
- Preheat oven at 375F.
- In 2 mixing bowls, combine wet and dry ingredients separately.
- Fold in wet ingredient mixture into the dry one and mix well.
- Line a 17"x12" baking sheet with aluminum foil and lightly coat with no-stick cooking spray. (This will help the wax paper stabilized on top.)
- Line a layer of wax paper lengthwise; 2 pieces of paper crosswise (overlapping each other in the middle) and another layer of lengthwise again. (Be sure to leave some extra wax paper in all sides hanging out of the baking sheet. You will need this extra when you roll the cake.)
- Coat no-stick cooking spray one more time on top of the wax paper.
- Lightly dust with all purpose flour.
- Pour batter on wax paper lined baking sheet.
- Use icing spatula to spread out the batter evenly.
- Bake for 15-17 minutes or until top of the cake springs back when touched.
- Let cool at room temperature for about an hour till completely cool.
- For filling, beat cream cheese, powdered sugar, butter and vanilla extract in a small mixing bowl until smooth. (It's best to do this step before rolling the cake because it is easier to spread the cream cheese while it is in room temperature.)
- To assemble the roll, make sure you have a big working surface for you to move around. (That means there should be enough room around your baking sheet because both of your arms and hands will move very quickly in order to roll this cake up.)
- The baking sheet should be on top of several single-layer pot holders, kitchen towel or damp paper towel. This will keep the baking sheet from moving around when you roll the cake. Otherwise, your forward movement of rolling the cake can push the baking sheet everywhere on the working surface or kitchen counter. That's the last thing you want to do.
- Spread filling evenly on cake, except the edge 1" around. As you roll the cake, the filling will start to push out to either end.
- Roll cake lengthwise starting from the end closest to you.
- First roll up about an inch towards the opposite end of the cake and press it down gently. (This is the foundation of your cake roll. So make sure that what you folded up stuck and formed a good core before continue rolling. To test it, let go and see if that little part of cake roll back and unattached. If it sticks, you are good to go and continue your rolling process. Otherwise, gently press that part of cake again until it sticks with the help of the filling. Hold on to the extra wax paper that you purposely had when you first lined up the baking sheet. As the cake rolls, the wax paper will peel off from the cake itself automatically. The motion of rolling the cake towards the opposite side from you should not stop in the middle. Once it starts, keep going. When the cake is rolled, gently squeeze the middle of the cake to help the filling to spread out to either side. This will help the cake roll form evenly before chilling in the fridge.)
- Chill red velvet pumpkin roll in fridge for 4 hours. Cut it into slices and enjoy.
Red Velvet Cake Roll Recipe Steps with Photos
 Mix dry and wet ingredients in two separate bowls
 Combine both dry and wet ingredients together and add red food coloring
 Transfer cake batter onto a wax paper-lined baking sheet
 Spread out the batter evenly
 Leave sheet cake in room temperature to cool down before rolling
 Spread cream cheese filling evenly, except 1" around the edge.
 Roll out about 1" of the cake and press it down gently to form a good core before rolling the rest of the cake
 Gently press the cake roll in the middle to spread out the filling to either end and chill in fridge
 Cut cake roll into slices
 Enjoy this beautiful red velvet cake roll
Broken Cake Roll Cake Recipe

When you first complete rolling the cake, it may look something odd. Do NOT make the decision at that moment. Chill the entire cake roll first. Once the filling is hardened up, your cake roll may come out ok. Otherwise, use the following recipe to turn it to a different dessert.
Additional Ingredient
1 tub (16oz) Whipped Topping
(Refer to the recipe below to make your own from scratch.)
Instructions
- Cut the broken cake roll into 1/3-1/2” slices.
- Single layer on a 8x10” baking dish. Use a spoon to press the cake down to fill up the gaps between the cakes.
- Evenly spread whipped topping on top of cake, dust with cocoa powder or chocolate shaving and chill again in the fridge for another 4 hours. Slice it up and serve to enjoy.
Make Your Own Whipped Cream Topping
Ingredients
1/2 cup Powdered Sugar
1 tsp Vanilla Extract
1 cup Heavy Whipping Cream
Instructions
- Whisk filling ingredients in a mixing bowl until peaks form and chill in fridge. (When you whisk either with a manual one or a hand mixer, make sure that the whisk is touching the bottom of the bowl. It makes a lot of noises. But that's the way how the heavy whipping cream incorporating the air to get airy. If you leave the whisk in mid-air, the whipping cream will stay in liquid form forever.)
Video
You May Also Be Interested In:
Get FREE eBook to Lose Weight this Summer

Once subscribed, you will be requested to confirm your email address one more time. Then, you will have a direct link to download all FREE e-books and exclusive recipes.
Subscribe to Our Newsletter Below

Recent Articles
-
Labor Day Weekend Cookout Backup Plan
May 31, 26 07:00 AM
Weather is one thing that nobody can control. What if you plan out everything for the weekend and now it needs to move indoor? No worries! You still can enjoy the juicy burger as it is coming off from… -
Easy Dinner Ideas
May 30, 26 06:24 PM
 Easy Dinner Ideas, with recipes and common sense cooking tips show you the surprising power of family meals and how to make dinner time family time.
 -
Smash Burger for A Smashing Cookout
May 29, 26 07:00 AM
Everybody is talking about smash burger. But do you really need to break your wallet to buy it? No, you can easily get the tools at home and make the patties by yourself. It's 100% fool-proof.


Home > Dessert Recipes > Red Velvet Cake Roll Recipe | A No-Towel Pumpkin Roll in Disguise