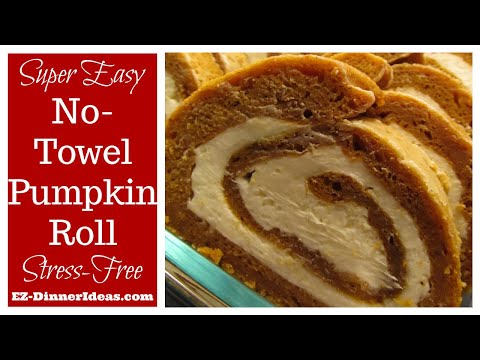
No-Towel Pumpkin Roll
Throw Away That Stinking Towel!!! Here's The Easy-Peasy Way to Make Cake Rolls!!!
This no-towel pumpkin roll is super easy that you don't need a towel or cloth to make a pumpkin roll. No kidding.

Total Time: 45-47 Minutes
Prep Time: 30 Minutes
Inactive Cook Time: 15-17 Minutes
Serving: 6-8
When I first read about the recipe of making pumpkin roll with a towel, my first reaction was, "Really? Are you kidding?"
Then, I watched the cooking channel. A celebrity chef did the same thing. So, the first pumpkin roll I made followed the steps by using a towel. It bothered me. Seriously! It bugs me since I heard about it. I just felt so gross about the idea. Even with a brand-new towel, I still can’t get over it.
In fact, I have relatives that hate the idea so much that they would rather not make it. So, I guess I am not the only one.
Then, all of a sudden, I remember making a Swiss roll in 8th grade that didn't require a towel, and it worked perfectly. DING, DING, DING, DING. So, I thought, "Why didn't I give it a try with the jelly roll recipe?"
There you go. Tada...I did it in the first trial. I am so thrilled to share this success with you. Once you did it, it will just ingrain in your brain. It is a skill that you do it and forget it. When you do it again the next time, you will just automatically do it as a part of the preparation process. No instructions needed.
The first time may take you a while to roll it. Just remember, practice makes perfect. Once you learn this skill, you can apply it to any jelly roll and cake roll recipes.
I know everybody may have their favorite pumpkin roll recipe. Please feel free to use your own and share it in the comment section below.
If you use your own recipe, skip all the directions involving the towel or cloth and follow the steps below to make your no-towel pumpkin roll.
Before moving on, I want to introduce you to some essential ingredients and tools that will affect the outcome.
Table of Contents
All-Purpose Flour vs. Cake Flour
Cake flour is milled into a finer, more gentle texture that has a lower protein count between 6 % and 8%. It generally results in a better rise and texture when making a cake. While normally bleached, companies like King Arthur sell an unbleached wheat flour that contains cornstarch.
All-purpose flour that contains cornstarch is often used when consumers are unable to buy cake flour. The all-purpose blend, however, is denser than cake flour because of the glutinous difference between cake and all-purpose flour.
I did try using both all-purpose flour and cake flour on this recipe at different times.
All-purpose flour is pretty much a staple in your pantry and convenient. Cake flour is like a specialty. It is definitely lighter.
If I use cake flour for this no-towel pumpkin roll, I add 1 1/3 cups (269g) instead of 1 cup (202g) all purpose flour. Still, the batter and the cake come out lighter in weight and softer and airier in texture.
For the rolling part, I would recommend using all-purpose flour if you are a beginner. Once you perfect the rolling technique, you can switch to the cake flour. The cake is softer to roll and easier to form in a nicer shape.
Roll It Lengthwise vs. Widthwise
My husband's family loves pumpkin roll. So, I make it all the time, even if it is not during the holiday season.
Whenever I make it, I try something different. I hope I can share all of my findings, experiences, and tips in order to save you the time and frustrations I encountered.
I have been rolling this no-towel pumpkin roll lengthwise, but I found that there are lots of professional pastry chefs and bakeries that roll it widthwise. You might wonder which way is better, right? Well, does it really make any difference?
Yes, it does make a BIG difference. So, let's find out.
Lengthwise
|
Widthwise
|
 This is the Gingerbread Roll I made by rolling it widthwise. Compare the picture at the bottom of the page; you can see the difference.
Overall, I still love to roll this no-towel pumpkin roll lengthwise mainly because of its taste. Do feel free to pick the best way to fulfill your needs.
I would love to hear from you which method you prefer to roll your pumpkin roll and the reasons behind it. Please share below in the comment section so other readers will get a chance to learn from your cake rolling experience.
Wax Paper vs. Parchment Paper
I have been using wax paper to make this no-towel pumpkin roll since I gave up that "stinking" towel. One day, I decided to make another one and realized I was out of wax paper.
Instead of going to the supermarket late in the evening, I decided to use parchment paper. Here is what I found of their differences.
Wax Paper
|
Parchment Paper
|
In conclusion, you can either use wax paper or parchment paper. It depends on your comfort level. Each has its own pros and cons.
Now, we covered the flour and the baking paper. Are you ready to start?
No-Towel Pumpkin Roll Steps with Photos
How to Line A Baking Sheet with Wax / Parchment Paper
 Line half of a baking sheet widthwise with a piece of wax or parchment paper
 Overlapping another piece of wax or parchment paper on the other half of the baking sheet widthwise
 Line the 3rd piece of wax or parchment paper lengthwise on the baking sheet which is on top of the previous 2 pieces of paper
 Make sure there is at least 2" (5cm) extra overhang on either side of the wax or parchment paper lengthwise
 When you coat the cooking spray on top of the wax paper, it will form the shape of the baking sheet (Parchment paper needs a bit of finger tugging though)
- Line wax paper or parchment paper on 15 x 10" (38 x 25cm) baking sheet (I use the 17 x 12" / 43 x 30cm).
- Line 2 wax paper on the baking sheet widthwise overlapping with each other. Allow about 1 to 1 1/2" (3 to 4 cm) extra on the edges.
- Line another piece of wax paper on top lengthwise. Allow about 2" (5cm) on either end.
 Line the wax or parchment paper
- Coat the paper with cooking spray and lightly dust it with flour.
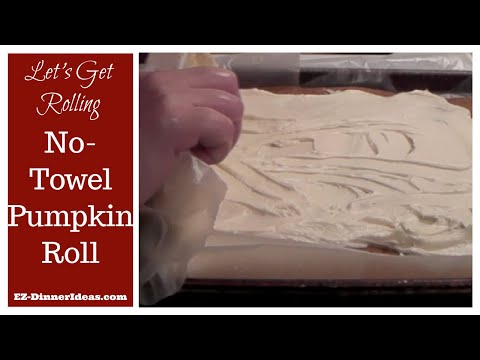
- Pour the pumpkin roll batter onto the paper-lined baking sheet and spread it evenly with a butter knife.
 Pour the batter into the paper lined baking sheet
- Bake the cake as instructed in the recipe.
- After the cake comes out of the oven, leave it cool at room temperature. Do NOT do anything other than prepare the filling.
- After the cake completely cools (about 30-60 minutes), spread the filling evenly on the cake with a butter knife.
- Make sure to leave about half an inch around the cake without filling.

How to Roll A Cake Roll?
- Put the sheet of cake with the filling in front of you lengthwise. Remove anything around the baking sheet that will block your movement when rolling this no-towel pumpkin roll.
- Put a kitchen towel, a wet paper towel, or a couple of pot holders under the baking sheet to stop it from sliding on the counter while you are rolling the pumpkin roll.
- Hold the edge of the wax paper in front of you.
- Before doing anything, get a good grasp on how to hold the paper so you won't slip.
- As you roll, the paper will start peeling off. So, don't worry about peeling it off at this time.
- When you start rolling up the first 2" (5cm) or so, use the paper to help you apply pressure on the roll to fold it. This is the most IMPORTANT step as it makes the pumpkin roll forms.
 The first 2" (5cm) roll-up is the most important step. Press it hard to make it stick.
- Once that little section of the roll folds and sticks together, hold on to the edge of the paper and keep rolling by using your hand movement to push the cake roll forward.
 Hold on to the paper and start rolling this no-towel pumpkin roll
 The paper will continue to peel off with the forward movement
- The paper will continue to peel off with the forward movement.
 Your hands' forward motion also helps the rolling process
 As the cake roll gets to the end, the paper will completely peel off
- Once the pumpkin roll is formed, apply pressure by squeezing the roll lightly to help create its shape.
 Once the pumpkin roll is formed, apply a little bit of pressure and squeeze the roll lightly to help its shape forming
- Cover the roll with plastic wrap and chill in the fridge for 4 hours.
- Trim both ends where there is no filling.
- Dust with powdered sugar (optional) and serve.
Once you get a good grasp of these steps, you will be able to discard the towel as it will become an instinct when making pumpkin roll or other cake rolls.
The recipe below is a twisted one similar to Libby's pumpkin roll. Unlike the original recipe, you will use a whole can of pumpkin. You don't need to worry about what you are going to do with the leftover.
 Dusting powdered sugar on top can hide the flaw
3 Mains Reasons Why Your Pumpkin Roll Cracks
These are the main 3 reasons why your pumpkin roll cracks.
Inner Roll Foundation Is Missing
When you first roll the cake, press it a little bit harder to let the very first section of the cake and filling stick together tightly. That’s your foundation as you keep rolling. The tighter the core, the better the shape your pumpkin roll will come out which lowers the probability that it splits or cracks on you.
Cake Was Too Dry To Roll
I don't roll my cake when it is warm. I tried that method like many recipes out there, and it never worked. The cake cracked. When I unrolled it, it kept rolling back on me when I tried to put the filling on the cake.
I only roll my cake after it cools down. I leave it at room temperature for about an hour after coming out of the oven. Room temperature inside my house is around 68F (20C). Adjust the time accordingly, but remember that leaving it too long will make it too dry to roll.
 Have you checked the expiration dates of the Baking Soda and Baking Powder in your pantry yet?
Baking Soda and/or Baking Powder Expired
Are both your baking soda and baking powder expired? These 2 play a very significant role in your pumpkin roll. While you might not expect these 2 ingredients to affect a cake's texture, they result in your success of a perfect cake roll.
No-Towel Pumpkin Roll Recipe and Instructions
For Cake Only
1 Cup (201g) All-Purpose Flour or 1 1/3 Cups (269g) Cake Flour (more for dusting)
1/2 teaspoon Baking Powder
1/2 teaspoon Baking Soda
1/2 teaspoon Ground Cinnamon
1/2 teaspoon Ground Cloves
1/4 teaspoon Salt
3 large Eggs
1 Cup (201g) Granulated Sugar
1 can 15-ounce (425g) Pumpkin Purée
Cooking Spray
For Filling Only
1 block 8-ounce (227g) Cream Cheese in room temperature
1 cup (201g) sifted Powdered Sugar
6 tablespoons (85g) Butter at room temperature
1 teaspoon Vanilla Extract
Powdered Sugar (for dusting; optional)
- Preheat oven at 375F (191C).
- Line wax paper on 15 x 10" (38 x 25cm) baking sheet (I use the 17 x 12" / 43 x 30cm) as shown above.
- Grease the wax paper with cooking spray and dust with flour.
- Combine flour, baking soda, baking powder, cinnamon, cloves and salt in a small bowl.
- Beat eggs and sugar in a separate large mixing bowl until thick.
- Beat in pumpkin.
- Stir in flour mixture.
- Spread evenly into a prepared baking pan lined with wax paper or parchment paper.
- Bake for 15-17 minutes or until top of cake springs back when touched.
- Let it cool completely in room temperature before putting the filling on top.
- For the filling, beat cream cheese, powdered sugar, butter and vanilla extract in a small mixing bowl until smooth.
- Spread evenly on the cake and leave about 1/2" (1cm) around the edge without the filling.
- Follow the instructions to roll the no-towel pumpkin roll.
- Wrap in plastics wrap and refrigerate at least one hour.
- Sprinkle with powdered sugar, if desired, before serving.
Video
You May Also Be Interested In:
Last Update: September 29, 2025
Get FREE Memorial Day Shopping List

Once subscribed, you will be requested to confirm your email address one more time. Then, you will have a direct link to download all FREE e-books and exclusive recipes.
Subscribe to Our Newsletter Below

Recent Articles
-
Labor Day Weekend Cookout
May 17, 26 07:00 AM
You may have had plenty of grilled food throughout the summer. But there are still some that you long for trying them. Or, some are so good that you are looking forward to the encore. Big cookout is t… -
Cooking with Kids Anytime
May 15, 26 07:00 AM
It is not only summer when you can cook with kids, but also anytime throughout the year. Summer happens to have more downtime comparatively speaking. To have the entire collection of kid-friendly reci… -
Easy Dinner Ideas
May 13, 26 06:15 PM
 Easy Dinner Ideas, with recipes and common sense cooking tips show you the surprising power of family meals and how to make dinner time family time.


Home > Holiday Recipes > No-Towel Pumpkin Roll