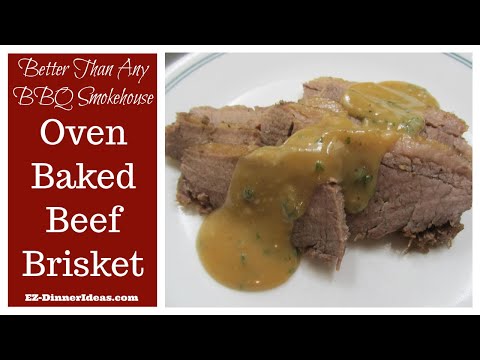
Oven Baked Beef Brisket Recipe
This Outrageous Delicious Meal Beat Brooks' House of Bar-B-Q
Oven baked beef brisket recipe is one of the easiest restaurant-remake dishes. This foolproof meal will wow everyone at your dining table.

Total Time: 6 Hours 20 Minutes - 6 Hours 25 Minutes
Prep Time: 20-25 Minutes
Inactive Cook Time: 6 Hours
Serving: 6-8
This recipe was inspired by two disappointing personal experiences. The beauty of it is that it turned something bad into something good. Well, WAY better than good.
Here in the Capital Region of Upstate New York, Brooks' House of Bar-B-Q is very well-known. Many organizations hire them for fundraising. Because of that, we went to their restaurant for a rare family gathering in the winter of 2024. Little did we realize that two thinly sliced strips of brisket and some "buffet" food would cost as much as a steak dinner at a local steakhouse. I hate to admit that lunch still left a bad taste in my mouth.
The other experience was buying some cooked brisket from the local supermarket deli section. Don't get me wrong: the price and the portion were very reasonable. But the meat was very chewy.
As a result, I started searching online for the best way to make brisket at home. With several twists, trials, and errors, I was so excited to finally nail it. This oven-baked beef brisket recipe may not look like typical ones you find online or see in restaurants. But I can guarantee you'll get a beautifully colored, very tender, and juicy brisket like you've never had before. Exaggerated? Wait till you try it! Make sure you let me know in the comments.
Table of Contents
- How to Prepare the Meat and What to Expect?
- What If Your Oven Doesn't Reach the Right Temperature?
- No Thermometer! So, How Can I Be Sure the Meat Is Cooked?
- Can I Broil the Brisket to Crisp the Top?
- What Side Dishes Go Well with This Recipe?
- Can I Make This 100% Low-Carb/Keto?
- What About Leftovers?
- Recipe
- Comments
TIPS & TRICKS
How to Prepare the Meat and What to Expect?
Trim some fat before seasoning. I recommend leaving about 1/3-1/2" thick of fat on top. It's important to leave enough fat to tenderize the meat and keep it juicy throughout cooking. After trimming, you'll likely lose about a pound. So, if you bought a 9-pound brisket, you'll have about 8–8.5 pounds remaining. The most important thing is to know the original weight before trimming. We'll cover that later.
You'll wrap the meat tightly with parchment paper and then foil. First, lay down a large piece of foil, then a piece of parchment paper. Place the brisket on top. Season both sides of the meat. Once that's done, I prefer to have the fat side up, facing me. Wrap the parchment paper around the brisket. Add another piece of parchment paper on top to seal the meat. Next, wrap the aluminum foil around the paper-wrapped meat. Add another piece of foil on top and tuck it underneath to seal every corner.
Depending on the shape and size, it may take several pieces of foil to wrap the brisket airtight. The pieces will crisscross, so some areas may have 3–4 layers overlapping. That's perfectly fine. It's better than having any holes allowing air to flow through during cooking, which will dry out the meat. That's the last thing you want. So, keep this in mind for the next few steps.
The parchment paper will lock the juices inside the pouch. The tightly wrapped foil will help transfer heat to the meat and cook it efficiently. That's why it needs to be airtight. As it cooks, the fat will drip down to the leaner part of the meat, making it tender and juicy.
(Side note: I learned this lesson the hard way. Once, I wrapped both parchment paper and foil around the meat, flipping it several times. When it was tightly wrapped, I lost track of which side was the fat side. At dinner time, I unwrapped the meat and discovered the fat was facing down. I ruined that brisket; it was like sandpaper. That's why I'm cautioning you about the importance of this step.)
Some juice will leak out during cooking, and it will make your house smell soooo good. Don't assume the meat is done; it's nowhere close. Treat any burning of leaked meat juice the same way. You might smell something burning in the oven; it doesn't mean anything. Be patient. (Of course, if there's a fire, you need to address it. But you'll know if that's the case.)
Once cooked, the meat package will shrink drastically. The airtight foil wrapper will seem like a balloon. DO NOT DISTURB IT! Leave it alone until it finishes its job. Otherwise, your earlier time and effort will be wasted.
(Side note: Here's another lesson I learned the hard way. The meat needs time to rest. When you take it out of the oven, everything inside the pouch is still cooking, and the juices are boiling. If you disturb it, all the juice will run out.)
You can't use a meat thermometer for this oven baked beef brisket recipe because the meat is relatively thin. Even poking the thermometer horizontally into the thickest part will burst the package and release the juices. If the meat isn't cooked, this creates a nightmare. All I ask is that you trust this recipe.
What If Your Oven Doesn't Reach the Right Temperature?
Every oven is different. No one knows your oven better than you.
I know some of you are still skeptical. If you have to, you could try a wireless meat thermometer. I've never used one before, but according to the instructions, you can stick it inside the meat before cooking. With this oven baked beef brisket recipe, it would be wrapped under the foil and parchment paper. You can then use a phone app to check the temperature. If you already have one of these thermometers, that's awesome! Please share your experience with others.
No Thermometer! So, How Can I Be Sure the Meat Is Cooked?
You may have noticed there's no meat thermometer used at the end of the cook time. This is because poking a thermometer through the foil can easily ruin the dish. And you don't want to invest the money into the wireless meat thermometer yet. What to do? Well, instead of a meat thermometer, keep the following in mind:
- The cooking time is the original weight of the meat minus 2.5 hours. For example, if the label shows 9.7 lbs before trimming, round it up to 10 pounds. 10 - 2.5 = 7.5. Your cook time is 7.5 hours.
- Know your oven. If your oven is less than 10 years old, its temperature is likely accurate. (This is based on my observation of the technology.) If it's older than 15 years, you might want to check it with an oven thermometer. Otherwise, the meat could be undercooked or overcooked.
- After about 3/4 of the cook time, you'll smell the meat. It's tempting to open the oven, but be patient! That's just the beginning. Then, the aroma might disappear. Don't worry; pay attention to the clock. The meat is almost done.
- Once you take the meat out of the oven, let it rest undisturbed for 20 minutes. The package will feel like a balloon. The meat shrinks significantly. Don't unwrap the foil yet.
Can I Broil the Brisket to Crisp the Top?
Unfortunately, no. The meat and pan will be very greasy, and broiling could easily cause a fire. Kitchen safety is the first thing in your mind ALL time.

What Side Dishes Go Well with This Recipe?
Since this oven baked beef brisket recipe is a fatty dish, I recommend simple, hearty sides like blanched green beans, sautéed broccoli, Outback Steakhouse Asparagus or a 5-minute romaine salad. Carb lovers can stuff the sliced brisket into a crusty roll and top it with gravy or some baked potatoes.
Can I Make This 100% Low-Carb/Keto?
Absolutely! For a keto gravy, skip the flour and stir heavy cream into the meat drippings. Simmer for 8–10 minutes, season with salt and pepper, and serve.
What About Leftovers?
 Can you believe this dish was made with the brisket leftovers? Click on the link below to sign up the newsletter to download this exclusive recipe.
My son and I love the leftovers as is. But, as mentioned, I once had the fat side down, resulting in "sandpaper" leftovers. Throwing food away is the last thing I want to see or do. So, I created a leftover makeover recipe. Sign up for my newsletter and you will get the exclusive access to download it.
Oven Baked Beef Brisket Recipe and Instructions
Ingredients
8.5lbs Brisket (trim fat to 1/3–1/2" thick)
Grill Seasoning (I use McCormick Perfect Pinch Steak Seasoning.)
Instructions
- Line a large baking sheet with aluminum foil for easy cleanup.
- Line a large workspace with foil, then parchment paper.
- Trim the brisket fat and cover both sides with grill seasoning (your preference).
- Ensure the fat side is up. Do NOT flip the meat while wrapping. Or, you will lose track which is fat side.
- Wrap tightly with parchment paper, then foil (airtight).
- Place the wrapped meat on the baking sheet and chill overnight.
- Let it sit at room temperature for 2 hours before cooking.
- Preheat oven to 300F and bake for the calculated time (original weight - 2.5 hours). In this case, it will be 6 hours (8.5 - 2.5 = 6)
- Rest the meat for 20 minutes before unwrapping.
- Use a long spatula to transfer the meat to a cutting board or serving platter.
- In a medium saucepan, whisk 1/4 cup of flour with 1/2 cup of the meat juices and fat (do not turn on the heat yet).
- Once smooth, turn the heat to high and whisk until bubbling. Cook for another minute.
- Slowly whisk in 2 cups of beef broth. Season with steak seasoning, salt, and pepper to taste.
- Thinly slice the brisket against the grain and serve with the gravy. Enjoy!
Oven Baked Beef Brisket Recipe Steps with Photos
 The goal of the amount of fat to keep is about 1/3-1/2" which will help to break down the meat and make it tender.
 Brisket after fat trimmed off and discarded.
 Season the meat on the fat side.
 Season the brisket on the lean side.
 Remember which is the fat side that it MUST face up when you transfer the brisket into the oven later on.
 After wrapping parchment paper tightly around the meat, wrap it with aluminum foil.
 It may take a few pieces of foil to cover the meat entirely.
 Transfer foil wrapped brisket to a foil lined baking sheet. FAT SIDE UP.
 Taking brisket out of the oven after 6 hours of baking and rest in room temperature for 20 minutes.
 Carefully unwrap the foil packet to keep the juice inside. Transfer juice into sauce pan to make gravy.
 Don't worry! The meat is still warm under the packaging. Make gravy.

Video
You May Also Be Interested In:
Get FREE eBook to Lose Weight this Summer

Once subscribed, you will be requested to confirm your email address one more time. Then, you will have a direct link to download all FREE e-books and exclusive recipes.
Subscribe to Our Newsletter Below

Recent Articles
-
Labor Day Weekend Cookout Backup Plan
May 31, 26 07:00 AM
Weather is one thing that nobody can control. What if you plan out everything for the weekend and now it needs to move indoor? No worries! You still can enjoy the juicy burger as it is coming off from… -
Easy Dinner Ideas
May 30, 26 06:24 PM
 Easy Dinner Ideas, with recipes and common sense cooking tips show you the surprising power of family meals and how to make dinner time family time.
 -
Smash Burger for A Smashing Cookout
May 29, 26 07:00 AM
Everybody is talking about smash burger. But do you really need to break your wallet to buy it? No, you can easily get the tools at home and make the patties by yourself. It's 100% fool-proof.

%20to%20download%20this%20exclusive%20recipe.)

Home > Beef Recipes > Oven Baked Beef Brisket Recipe | Better Than Brooks' House of Bar-B-Q